Working with lesson editor
Lesson editor offers you complete freedom of learning, allowing you to make your own courses or modify existing courses.
To open Lesson Editor, click the ![]() tab-button in the top-left corner of the Main window. The screen will appear as shown in the picture below:
tab-button in the top-left corner of the Main window. The screen will appear as shown in the picture below:
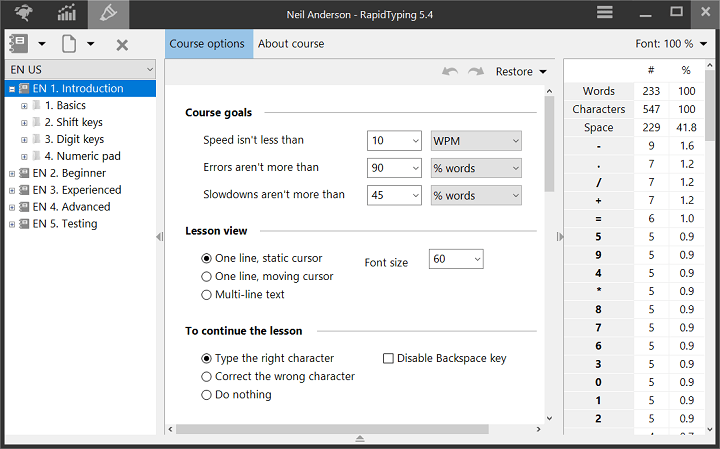
The Lesson Editor window is composed of the following controls:
- Course and lesson list
- includes buttons: for adding, removing, inserting (import), and saving (export) existing courses and lessons.
- Navigation Tree includes the current keyboard layout choose, current course, section and lesson.
- Editing panel is the area where you can edit the course options or of the selected lesson in the Navigation Tree.
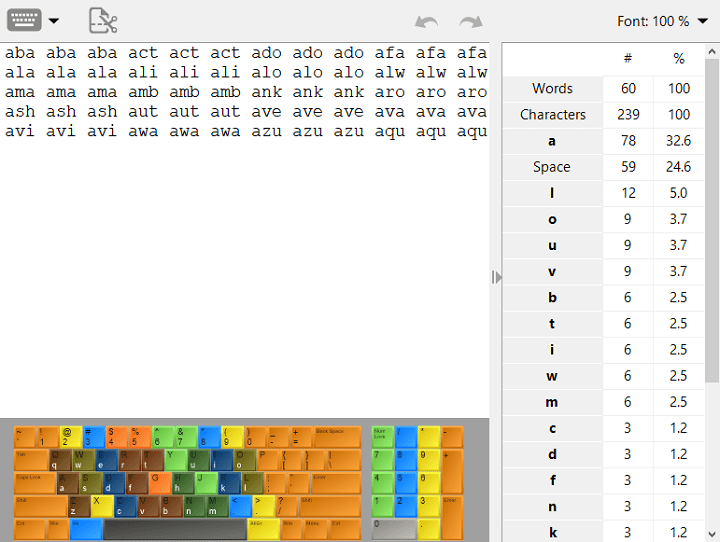
- Text analysis table displays the number and percentage of words, characters, spaces and specific characters in the lesson.
- Virtual keyboard highlights the characters used in the selected lesson. Keyboard language depends on the course language; you can choose it in the Keyboard layout.
You can always easily hide/show:
- Course and lesson list, clicking the
 or pressing the Ctrl+K
 - Text analysis table, clicking the
 or pressing the Ctrl+L
 - Properties, clicking the
 or pressing the Ctrl+W
 - Virtual keyboard, clicking the
 or pressing the F9
Keyboard layouts
![]()
Courses in the Lesson Editor are grouped by the keyboard layouts installed in your OS. You can select the current layout in the Keyboard layouts list under the Toolbar buttons and show the courses created for this layout only. The auto-detect item RapidTyping hasn't courses, use this options, if you want to create multi-language courses.
- If the auto-detect item is selected, RapidTyping will ask you to change the system language in during the lesson for each incompatible character for the current keyboard. After you change the system keyboard language, the virtual keyboard reloads and the current keys are highlighted.
- If a specific layout has been selected, you can't change the system language in during the lesson and the Virtual keyboard is not reloaded.
Working with courses
Using Course menu, on the Toolbar:
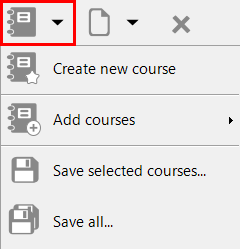
You can:
- add new courses (button on the toolbar),
- insert existing courses from file or RapidTyping library
- Add a course -> From file
- Add course -> from library
- save selected courses,
- save all courses, using appropriate menu items.
For removing the selected group, use the ![]() button.
button.
Add a course from the RapidTyping library
The first time you run the program, RapidTyping creates courses for all the keyboard layouts installed in your OS. If you want to take courses for another keyboard or restore the removed or changed courses, use the RapidTyping library:
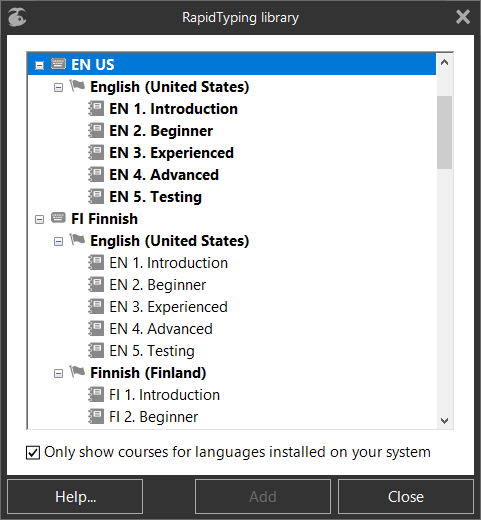
- find the needed language and keyboard layout in the list,
- expand the keyboard item,
- select the needed course,
- click Add button or double-click on the course,
- the selected course appears in the Lesson Editor; if such a course already exists in the course list RapidTyping asks you: Rewrite existing course or Create copy.
- if you have one Group, the new course will be assigned to the Group automatically
- if you have more than one Group, you need to assign a new course to the required Groups on the Group properties.
Course options
In the Course options, you can set up the configuration for a selected course. All options are placed on a one page and dived by sections.
Course goals
This area allows you to define what a good lesson result is for the current course.
- You can customise values for Typing speed, Accuracy and Slowdown, so that it is convenient for you or your students.
- If a student has any lesson result (Speed, Accuracy, or Slowdown) which is worse than that defined in Course goals, the student will be offered the chance to repeat the current lesson.
- Also these values are used to show good and bad results (green and red colours) in the statistics diagrams and in the Lesson menu in the Current lesson for marking already finished lessons.
Lesson view
This area defines how the text of the lesson will look like on the screen:
- One line, static cursor means that you'll see only a single line; the cursor will be fixed while the text itself will flow smoothly as you type.
- One line, moving cursor means that you'll see only a single line; the cursor will flow smoothly as you type while the text itself will be fixed.
- Multi-line text means that you'll see multiple lines; the cursor will flow smoothly as you type while the text itself will be fixed (as in the previous option).
- The drop-down list to the right lets you define the font size of the lesson text.
To continue the lesson
This area defines the program's behavior in case of typos:
- Type the right character type means that the lesson will be paused until you enter the right character to overwrite the wrong one.
- Correct the wrong character means that you'll have to delete the wrong symbol manually (using the Backspace key) and then press the right key.
- Do nothing means that the program will ignore typos without pausing the lesson.
- The check-box to the right lets you disable the Backspace key. In this case, the user can't correct the wrong character ( this option is disabled for the Correct the wrong character )
Lesson duration
Here, you can customise the lesson duration.
- If you choose the first option, a timer will interrupt the lesson after a specified time. An incomplete lesson will be added into the statistics with the Done rate, which shows the percentage of the lesson completed.
- Don't stop the lesson allows the student to finish a lesson, without a time limit.
Metronome setting
This section defines the following metronome options:
- Initial time period for the metronome in seconds ( this is the recommended time for typing one symbol ),
- time period without change,
- or changes based on typing speed.
The end of the lesson
These options define the program behavior at the end of the current lesson.
- Show lesson results allows you to show the Results window at the end of the lesson.
- First option allows you to add the Next step tab on the Results window, for automatically determining the next lesson,
- Second option allows the student to choose the next lesson, using the OK/Cancel buttons or Enter/Ecs shortcuts.
- Don't show lesson results
- First option allows you to use RapidTyping recommendations for the Next step.
- Second option - student always moves to the next test/lesson.
- Third options - student always repeats the current test/lesson.
- continue training / testing,
- go to the Student statistics,
- close the application.
At the close application
These options define what kind of data is saved when you close the program:
- current lesson state,
- statistics of an unfinished lesson, the program adds statistics of an unfinished lesson with Done % mark.
Show
This area defines the appearance of the following interface items:
- Virtual keyboard (when this option is disabled, the corresponding F9 shortcut is also blocked)
- base finger position, when this option is enabled, hands on the virtual keyboard are placed in the base position in the begin lesson and the student needs to press any key to start the lesson, otherwise the lesson begins from pressing the first character in the lesson.
- Hands on the virtual keyboard
- Lesson text highlighted
- Status bar
- String with tips
- Metronome (yellow progress bar below the lesson and yellow text highlighted in the lesson)
- Toolbar
- course selection
- lesson selection
- Pause button, when this option is disabled, the auto-pause feature (when the lesson loses focus) is disabled, and the corresponding F5 shortcut is also blocked.
- current lesson speed
- current lesson accuracy
- current lesson time
- Restart the lesson button, (when this option is disabled, the corresponding F8 shortcut is also blocked)
Working with lessons
Using the Lesson menu, on the Toolbar:
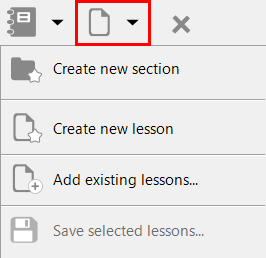
You can:
- add new lesson, button on the Toolbar
- import the existing lessons from: TXT, RTF files
- export lessons in text format
For removing the selected lesson use the ![]() button, or Delete shortcut
button, or Delete shortcut
Lesson edit
Once you've you added a new lesson or imported text from a file, you can edit a lesson in the Editing panel
If you want to create a lesson for the Numeric pad, change the lesson type in the Lesson Type menu on the Toolbar; by default, the created lessons are joined with Main pad.
If a long text is inserted into the lesson from a file, you can split such lesson into many smaller lessons using a Split lessondialog box, by clicking the Split lesson button on the Toolbar.
The standard Undo/Redo commands are enabled on the toolbar and by pressing Ctrl+Z and Ctrl+Y shortcuts.
Table analysis text displays the number and percentage of words, characters, spaces, and specific characters in the lesson.
In the Font size menu on the right on the Toolbar, you can change the font size for text editing area and Table analysis text.
Split a lesson
You can split a lesson into many smaller lessons using a Split lesson dialog box.
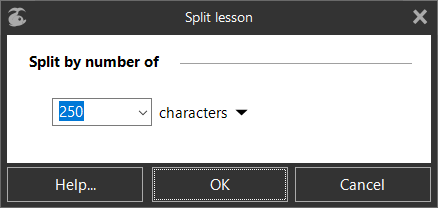
You can split a lesson by number of:
- characters,
- words,
- sentences,
- paragraphs.
If you dislike the result, you can use the Undo button on the toolbar or press the Ctrl+Z shortcut.
Character validation
If a text that is being pasted or imported from a file contains characters which that are unsupported by the keyboard (such as special Word symbols or foreign-language symbols), RapidTyping will display a dialog box that which asks if you if want to skip them.
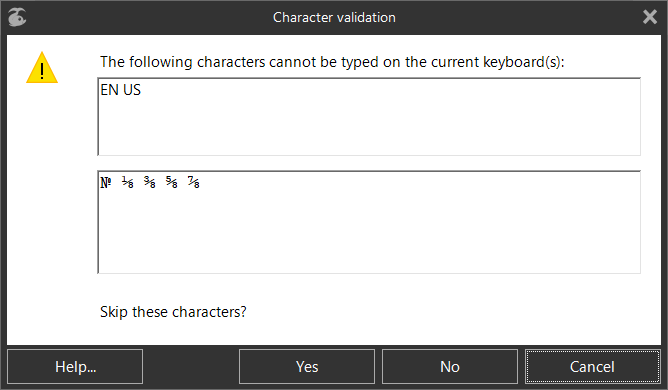
If the current course has a specific keyboard layout in the Course properties, RapidTyping will check characters against on the selected keyboard layout. However, if auto-detect is selected, RapidTyping will check all the keyboards enabled in your OS.
See also:
Typing Games
Rapid Typing Reviews
good